Breach 3


Rate it
How to play Breach 3
Each game uses different controls, most Amiga games use both mouse and keyboard.
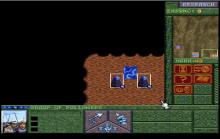
Breach 3 Description
Breach 3 Strategy Tips
Breach 3 is a game where sound tactics and good resource management can make
the difference between a successful squad leader and a dead one. What follows
are some strategy tips that have been compiled on various aspects of the game
by the Breach 3 play testing squad.
Marines: The marines in your squad are not mindless robots that follow your
every command. Depending on the various stats of an individual marine, he
or she may run at the sight of an enemy or even attack after you've ordered
them to hold fire. The marine biographies offer a good indication of how each
marine will perform in combat. Select your marines with care, and remember
that once one is dead, he or she will be unavailable for the remainder of
that campaign.
Equipment: Each campaign starts out with a limited number of items available
to you and your squad. These item will not be replenished after each
mission, and a prudent squad leader will be stingy in issuing and using
equipment. Items of special importance are O2 tanks, energy shields, and
rocket launchers. Every effort should be made to recover these items from
dead marines before ending the mission. There are also many items that can
be found during the mission. Collecting these items can help restock the
equipment stores for future missions.
Movement: Asking an entire group of marines to burst into an enemy filled
room is a good way to quickly end your career. Only one marine should be
sent into an unexplored room. The rest can be set up to cover his retreat
if hostile forces are encountered. This allows the squad to put a maximum
amount of fire power onto the target area while the enemies have to jockey
for firing positions in the crowded doorway. (See Enemies) Likewise, you
do not want marines crowded into a doorway trying to fire at multiple
enemies. A better tactic is to pull back and wait for your enemies to walk
into an ambush. If they decide to stay in the room, try having the marines
enter the room from 2 or more places. The enemies will be caught in a
crossfire, and will have to choose between several different targets,
rendering them unable to concentrate fire on a single group of marines.
Having your marines move while on Fire-at-will is very risky. If
these marines are surprised by an enemy they can be slow to follow
any pull back commands you issue, as they will continue to pause to fire
back at the enemies.
When playing some of the more difficult missions you should take care
that your marines do not walk too close to an autodoor that leads to an
unexplored room. If a marine sets off the auto door it can open, releasing
a hornet's nest of enemies while your squad is concentrating on other things.
Enemies: The enemies in Breach 3 will react differently depending on their
orders. Some will pursue fleeing marines while others hold their positions
content to snipe from cover. Most enemies are extremely adept at hand to
hand combat, and will try to close with the marines at the earliest
opportunity. Each enemy type has one of a variety of weapon types ranging
from teeth and claws, to lasers, to psionic blast attacks.
Other Hazards: Autoguns and gun emplacements will emit a steady stream of
fire at any marines within range. These defenses can be difficult to
destroy, often requiring a well placed grenade or rocket to put them away.
It is often a better policy to run past these obstacles to safety, rather
than attempt to take them out.
Grenades and Rockets: These are the weapons of choice for most marines.
A single accurate round can take out several enemies at once. The down
side is that a dropped grenade or misfired rocket can kill an entire squad
of marines in the time it takes to say "whoops..."
Grenades and rockets should be fired with extreme care while around
objects and walls. It is especially risky to launch these items through
doorways: A marine standing near a doorway who tries to shoot a rocket or a
grenade through it and misses is in big trouble.
While on ships rockets and grenades present the added risk of
potentially blowing through the outer wall of the structure. This will
cause a BREACH that depressurizes the entire area, sucking everything that
isn't tied down (including marines) out into the cold vicious vacuum of
space.
Transporters and Crack units: These items are necessary to fulfill many of
the mission objectives. Frivolous use or loss of these items might result
in an inability to finish some missions in a campaign. Cowardly squad
leaders may also use emergency transports to exit a mission, however any
marines left behind at this time will be killed and their equipment lost.
Medkits: Medkits are the lifeblood of combat marines. While in combat, less
disciplined marines will use the medkits automatically without being told,
while strict marines often wait until death comes knocking before using one.
Even when under fire the game can be paused and medkits used. This will
often save a marine who is in real trouble with no time to run for cover.
As nice as medkits are, they do come in a limited supply and must be used
conservatively.
Camo Suits: A camouflage suit renders a marine effectively invisible to
all enemies. These suits can be very powerful when used correctly, but are
not available in all missions. When a marine in a camo suit fires at an
enemy, all enemies within line of sight will fire at the location the marine
was in when he fired. Care should be taken however with overaggressive
marines as they will tend to engage the enemy as soon as they see them
despite the fact that the marine is invisible. Also, if a marine in a camo
suit bumps into an enemy it will immediately attack the marine, as will all
other enemies in the area.
Grav Belts-Boots: The FWSF Marines have had a history of using rockets and
grenades to blow stuff up aboard ships. The problem is that the marines
would often BREACH the hull of the ship and get themselves sucked out into
the chilly vacuum of space. Marines wearing grav belts or boots will avoid
being dragged out into space if a breach occurs. These marines will also
need to be wearing O2 tanks if they intend to keep breathing.
Campaigns
Promotions: A squad leader can move up in rank depending on how well he
performs in his career. The ranks are:
Lt Commander
Commander
Captain
Commodore
Fleet Commodore
Sector Commander
Quadrant Commander
Rear Admiral
Vice Admiral
Admiral
Fleet Admiral
Decorations: There are five different medals that may be awarded to squad
leaders who perform above and beyond the call of duty. These awards are
as follows:
FW Cross: This is awarded if the squad is successful in achieving a high
enemy kill count on a single mission.
Distinguished Service: Awarded to a squad leader who achieves a high personal
kill count.
Purple Heart: Given to a squad leader at the end of a campaign in which he
was severally wounded.
Distinguished Career Cluster: This award is given only to those squad
leaders who have an exemplary and consistent record of successful missions.
FW Medal of Honor: Given to a squad leader who has proven himself over
time to be worthy of this highest honor.
Briefings: You should always read the mission briefings carefully. Certain
items will be needed to complete mission objectives and once a mission is
started there is no going back for additional equipment.
Foxhunt-
Do not let your marines be distracted by the lovely scenery in this
campaign as danger is always just a few bushes away. This mission is not as
combat intensive as the other missions, but your marines will be logging
in a lot of mileage slogging through the various levels of wide open
country and crowded city complexes.
X-
In your quest to help the X-Group stop the fearsome aliens, your
squad will encounter some stiff competition. Keep the crack unit handy as
you'll need it when storming alien ships and compounds to download critical
data. This campaign is only moderately hard if you can manage to stay
successful, but lose a mission and you'll have to work miracles on the
"suicide" scenarios.
Owls-
This campaign is very hard and will require the use of many medkits,
many rockets, and many, many grenades. Unfortunately these items are in
limited supply and you will have to use them wisely. Also, many enemies are
located in explosive sensitive areas, (read: next to fuel cells and outer
ship walls), and careless use of grenades and rockets can spell disaster.
The final missions of this campaign are next to impossible and only the
most experienced squad leaders will have a chance of success.
Dole-
This is debatably the hardest campaign of all.(They can't get much
tougher than Owls.) Dole has over 34 possible endings, and it will probably
take several plays before an experienced squad leader can achieve a complete
victory. The length of this campaign puts a serious strain on both supplies
and marines. Although there are enough items in each mission to keep your
stores stocked, you are stuck with the group of marines you start with.
Any squad leader who can successfully complete both Owls and Dole deserves a
week vacation on the planet Humidor....
Breach 3 - additional information
Publisher
Developed by
Cover Art